Excel 2016: Using Worksheets and Workbooks

How to keep record and find your data fast and easy
Excel can be compared to a real book and we call that book a “workbook”. A workbook can contain one or several pages, which in Excel, we call “worksheets”. Now, imagine a workbook containing lots of information all mixed-up in only one worksheet; for instance, a company’s financial statement for five long years. Would you be able to locate specific information, like a month’s report, easily? Obviously, the answer is NO. That’s when the idea of having multiple worksheets becomes handy. Excel indeed is a great tool, especially for record-keeping, and of course, finding.
Adding worksheets to existing workbooks
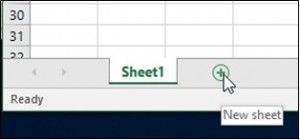
Most of the time, we need to add worksheets on our workbook to organize the contents of our file. To add worksheets –
- Click on the plus sign next to Sheet1.
- Keep adding sheet tabs until you have as many as you need.
Deleting Worksheets
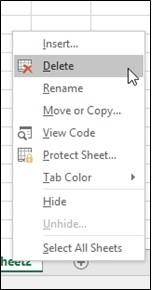
The easiest way is to Right Click on the sheet tab you want to delete and then select Delete, as shown below. The worksheet will be deleted immediately.
Copying worksheets
If you want to have duplicate copy of a worksheet, just follow these steps:
- Right click on the worksheet tab.
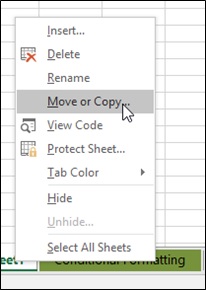
- Select Move or Copy Sheet.
- Tick Create a copy.
- Select where you want to place the copy.
- Click Ok.
Moving worksheets
Aside from the step indicated above, sequence of your worksheets can also be changed by following this technique: Click and drag on the sheet tab to move it then drag this to the location you wish to place it.
Renaming a worksheet
To have a more meaningful and organized workbook, you can rename your worksheets instead of using the usual Sheet1, Sheet2, etc.
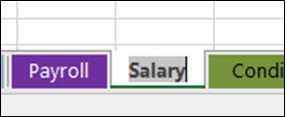
- Double click on the sheet tab. (Current name will be highlighted.)
- Type your preferred name and then click away to confirm.
Grouping worksheets
When worksheets are grouped together, whatever you do in one sheet will automatically be done to the others. Through this, you can apply formatting and create formula to all of the sheets in the group at once.
- Grouping worksheets that are next to each other

- Click on the first Sheet tab.
- Hold down the Shift key.
- Click on the last Sheet tab that you require.
- The Sheet Tabs of the sheets that are grouped will turn white if not colored and go pale if they have color applied.
- Grouping worksheets that are not next to each other

- Click on the first Sheet tab.
- Hold down the Control key.
- Click on any other Sheet tabs that you require.
- The Sheet Tabs of the sheets that are grouped will turn white or go pale.
Changing worksheet tab color
When you have many worksheets, changing the tab color will be helpful in recognizing the one you need.
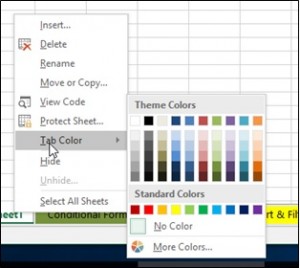
- Right Click the Worksheet tab.
- Click on Tab Color.
- Choose the color from the color palette.
Hiding worksheets
- Right click on the worksheet tab you wish to hide.
- Select Hide.
Un-hiding worksheets
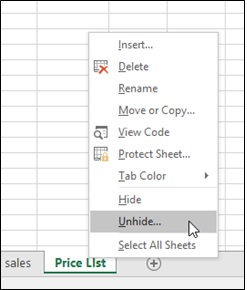
- Right click on a worksheet tab.
- Select Unhide.
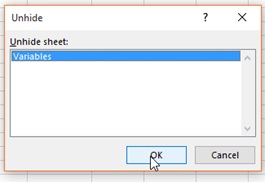
- Click on the worksheet you wish to unhide.
- Click OK.
Customizing your Excel 2016 workbook is as easy as 1, 2, and 3! These steps are done not only to make it more appealing, but also to make it more structured and organized.
We have even more useful articles:
- How to Split Cells in Excel for a better view
- How to Copy Formulas in Excel
- Get Faster Using the Flash Fill Feature
- Save Time Using Autofill
- 3 Simple Steps to Hide and Unhide Portions
- How to Format Cells and Worksheets
- Essential Facts About Worksheets and Workbooks and How to Utilize Them
- Customize The ‘Quick Access Toolbar
- How to Use Excel’s Basic Functions
